I have decided to do a series of blog posts about deconstructing an image, showing the technical and artistic considerations taken before, during and after the shot.
The shot in question, which I call Lost and Alone, is a shot I took of my daughter, back in 2013. Personally what I think makes this photo most interesting is its gestation and production, slightly more so that the actual result (I was a little disappointed with the sharpness of the shot, something that was my fault on the day.)
But it was such a good concept and it took so long to actually shoot, that it makes a great story anyway..

Click to see image at full size
Pre-Production
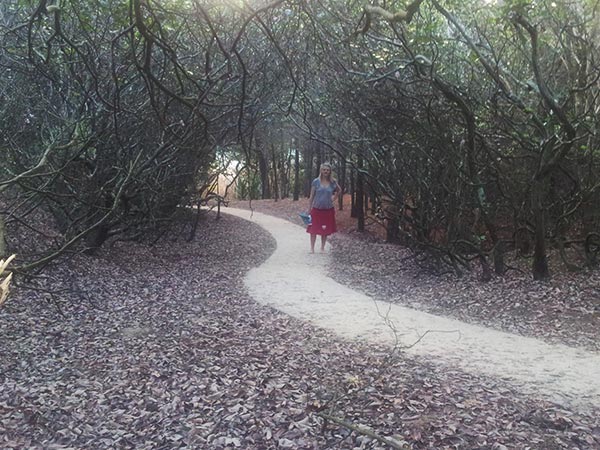
OK, so it all started with a walk down at the beach in the spring of 2012. As I was coming home, I noticed a nice s-curve in the line of the path. A few days later I stopped again at that spot, and moved off the path to find a better angle. I crouched down under a tree, and there it was!! I thought that the lines of the path with the background would work very well for a photo.
I can’t remember whether it was straight away or some days later, but I thought that if I could find a little girl with a red dress, it would make a good location for a take on Little Red Riding Hood, or at the very least, the idea of a girl being a bit lost and alone in the dark and scary forest…
I started to visualise this idea. I already had the background, so as I was lying in bed going to sleep at night, I would imagine how I would light it, where the model would stand, what height I would need to shoot from and what lens would be appropriate, whether I would be able to shoot it in one go or have to composite it. All sorts of things ran through my mind.
 At one point in late 2012, I remembered to take my phone out on my walk (something I religiously didn’t do), so I could get a quick snap to look at in my planning. And so, over the course of about 6 months, I had a very firm visual in my head about what it could look like.
The reason it took six months was just that life got in the way, and that I didn’t really have a 6 year old with a red dress at my disposal. And sometimes ideas get a bit stuck in your head. But that process of visualising an image before you go out and take it is a very valuable one, and totally refined the idea in my mind.
Then one day in late January in 2013, my daughter Scout came home with a beautiful white dress she had borrowed off her friend. I took one look at it, and something clicked. I dropped the “little girl in a red dress” idea in that instant. I looked at the clock.
“Hey Scout”, I said. “Do you want to go do a photo shoot down by the beach?”
“When?”, she asked. “Uhmm, now…”
Production
OK, we went and set up. Lots of people interrupting us as they walked back from their walks on the beach. It was 6.30pm when we got there, but as it was summer it was still very bright. Perhaps I’d been too quick? There was in any case lots of light. I took a test shot at correct ambient to see what it looked like and what choices I had. (see Image 2.) I also started trying to finalise where the model was going to stand. I had envisioned her standing at the joint of the s-curve, but it placed her too centrally in the composition, and too small for the field of view I wanted.
The look was also completely wrong. I wanted a dark and gloomy forest, not a brightly lit beach path. This was easy however. One of the joys of using flash in photography is the ability to light the background and the foreground (subject) independently. I adjusted my exposure so that, as far as the camera was concerned, the shot was 3 stops underexposed. This gave me a nice moody background. And when I added flash (at the right power) to my subject, it started to come into line with the ideas I had. (see Image 3.) The positioning of the model still wasn’t right, as the composition was too symmetrical. I realised that she’d have to be much closer, which would also give me the asymmetrical composition I wanted.
Another obvious problem was that to get the right angle of light (I wanted her to be lit in a pool of light, almost from above) was that the light stand would need to be in the shot. Of course, if I had a budget, I could have had an assistant with a boom stand bringing the light in from outside the shot, but this was a one man shoot, and so I had to improvise. This is where a tripod came very much in handy.
I was always going to use a tripod to lock in my background composition. I didn’t want that to fluctuate, and it was also quite a low shooting position, half under a tree. I connected a shutter release and a radio trigger for the flash and I could fire it standing next to the tree. But another advantage of the tripod was that I could take a shot without the light stand in it, and use that to erase the light stand from the other shot (as it would be perfectly aligned).
The lighting involved was just a Canon 580EX speedlight pointing into a reflective umbrella. A small softbox might have been a better choice of modifier, but at the time, I only had a couple of umbrellas, and so I had to make do. With the lightning, it was more about the angle of it being right, and I knew I could limit the spread of the light in post production, using the unlit shot as source material.
So after about 30 minutes of refining the expression I wanted from the model, the placement of her hands, the precise angle of her body into the light, (and the inevitable delays of people walking through the set :)) I finally got the shot. (see Image 4.) Now I just had to take another shot without the flash being in the shot, that I could use to erase the light stand from the image. (see Image 5.)
So, we were all good. 40 minutes after we’d arrived, we packed up and headed home. Now it was just time for the editing.
Now I mentioned previously that I wasn’t perfectly satisfied with the execution of this shot. All the planning in this case had been in my head. If I had done a test shoot I would have realised a few issues that were going to pop up. But life’s like that – a learning opportunity :) The problem was that in the final shot, the exposure was 1.5seconds at f/11 at 200 ISO. Anyone who knows anything about photography will see the issue here. The shutter speed was too slow. I knew that the flash would help greatly, instantly “painting” the subject on top of the ambient (I had rear sync flash enabled). But there was a bit more ambient than I had thought there would be, and with some more thought would have been able to reduce that shutter speed considerably (400 ISO and f/8 for example would have brought it down to .4 of a second. But such is life. I’m still happy with the result, despite it not being quite as sharp as I would want it to be.

Image 2. A correctly exposed ambient exposure.

Image 3. Underexposed background with flash on subject.

Image 4. The chosen exposure. Now I need to get rid of that light stand.

Image 5. Thes shot used (no flash) to replace the light stand.
Production
OK, we went and set up. Lots of people interrupting us as they walked back from their walks on the beach. It was 6.30pm when we got there, but as it was summer it was still very bright. Perhaps I’d been too quick? There was in any case lots of light. I took a test shot at correct ambient to see what it looked like and what choices I had. (see Image 2.) I also started trying to finalise where the model was going to stand. I had envisioned her standing at the joint of the s-curve, but it placed her too centrally in the composition, and too small for the field of view I wanted.
Image 2. A correctly exposed ambient exposure.
The look was also completely wrong. I wanted a dark and gloomy forest, not a brightly lit beach path. This was easy however. One of the joys of using flash in photography is the ability to light the background and the foreground (subject) independently. I adjusted my exposure so that, as far as the camera was concerned, the shot was 3 stops underexposed. This gave me a nice moody background. And when I added flash (at the right power) to my subject, it started to come into line with the ideas I had. (see Image 3.) The positioning of the model still wasn’t right, as the composition was too symmetrical. I realised that she’d have to be much closer, which would also give me the asymmetrical composition I wanted.
Image 3. Underexposed background with flash on subject.
Another obvious problem was that to get the right angle of light (I wanted her to be lit in a pool of light, almost from above) was that the light stand would need to be in the shot. Of course, if I had a budget, I could have had an assistant with a boom stand bringing the light in from outside the shot, but this was a one man shoot, and so I had to improvise. This is where a tripod came very much in handy.
I was always going to use a tripod to lock in my background composition. I didn’t want that to fluctuate, and it was also quite a low shooting position, half under a tree. I connected a shutter release and a radio trigger for the flash and I could fire it standing next to the tree. But another advantage of the tripod was that I could take a shot without the light stand in it, and use that to erase the light stand from the other shot (as it would be perfectly aligned).
The lighting involved was just a Canon 580EX speedlight pointing into a reflective umbrella. A small softbox might have been a better choice of modifier, but at the time, I only had a couple of umbrellas, and so I had to make do. With the lightning, it was more about the angle of it being right, and I knew I could limit the spread of the light in post production, using the unlit shot as source material.
So after about 30 minutes of refining the expression I wanted from the model, the placement of her hands, the precise angle of her body into the light, (and the inevitable delays of people walking through the set :)) I finally got the shot. (see Image 4.) Now I just had to take another shot without the flash being in the shot, that I could use to erase the light stand from the image. (see Image 5.)
Image 4. The chosen exposure. Now I need to get rid of that light stand.
Image 5. Thes shot used (no flash) to replace the light stand.
So, we were all good. 40 minutes after we’d arrived, we packed up and headed home. Now it was just time for the editing.
Now I mentioned previously that I wasn’t perfectly satisfied with the execution of this shot. All the planning in this case had been in my head. If I had done a test shoot I would have realised a few issues that were going to pop up. But life’s like that – a learning opportunity :) The problem was that in the final shot, the exposure was 1.5seconds at f/11 at 200 ISO. Anyone who knows anything about photography will see the issue here. The shutter speed was too slow. I knew that the flash would help greatly, instantly “painting” the subject on top of the ambient (I had rear sync flash enabled). But there was a bit more ambient than I had thought there would be, and with some more thought would have been able to reduce that shutter speed considerably (400 ISO and f/8 for example would have brought it down to .4 of a second. But such is life. I’m still happy with the result, despite it not being quite as sharp as I would want it to be.
Post-Production
The post production was relatively straightforward on this shot. I processed the raw files in Camera Raw, making sure both shots were processed identically to ensure good blending. Then I combined the two chosen images in Photoshop. The unlit shot was the base image, as instead of removing the light stand, I realised it was easier just to add the model. So all I had to do then was to place the flash image on top of that and using a layer mask, remove everything except the lit subject. See Image 6.
Then I added a layer and cloned some of the background tree in to thicken up the forest, another dodge and burn layer to further darken the edges and part of the path, and then finally a duplicate layer of the subject using a sharpening method to add a bit more sharpness to the model.
And voila.
I love the isolation of the subject in the light, as well as the deep russet tones of the undergrowth and the final composition of the shot. Scout did an amazing job, with the pose and expression, and I just love the way she is holding her finger. Without being too specific about the message (as that’s often not a good idea with photography, as it seems to work better with an ambiguous message more so than a specific one) I like the feeling of fear, isolation and loss that comes from this image, and it remains one of my favourite images.

Image 6. The “subject” layer.

A final before and after image.